
How to Install Mods on 7 Days to Die
7 Days to Die has one of the best modding scenes in survival gaming, from small quality-of-life tweaks to total overhauls like Darkness Falls and Undead Legacy. Your server supports all of it.
1. Check whether you need EasyAntiCheat off
Section titled “1. Check whether you need EasyAntiCheat off”The rule is more specific than “mods need EAC off”. EAC checks code on the player’s machine, so what matters is whether a mod needs files installed locally by each player.
| Mod type | EasyAntiCheat |
|---|---|
| XML-only modlet (recipes, loot, spawns, balance) | Works with EAC true. The server pushes changes to clients |
| Server-only admin tooling | Works with EAC true. Players never load it |
Anything with a .dll, custom icons or asset bundles |
Needs EAC false |
| Any overhaul modpack | Needs EAC false |
Most of what people want is in the bottom two rows. If you’re not sure, set EasyAntiCheat to false — that runs everything.
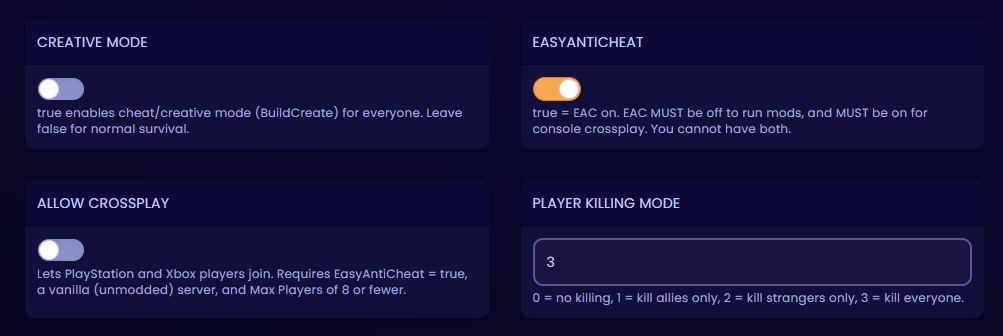
- Log in to the Nitro Panel and stop your server.
- Open the Startup tab.
- Set EasyAntiCheat to
false. - If Allow Crossplay is
true, set it tofalsetoo. Consoles can’t join an EAC-off server, and leaving it on only confuses the server browser.
2. Understand the folder structure
Section titled “2. Understand the folder structure”Every 7 Days to Die mod is a folder containing a ModInfo.xml file. That file is what the game looks for — a mod without one is invisible to the server.
Mods/├── SomeCoolMod/│ ├── ModInfo.xml│ └── Config/│ └── items.xml└── AnotherMod/ ├── ModInfo.xml └── Config/The mistake that catches almost everyone: unzipping often produces a wrapper folder, leaving you with Mods/SomeCoolMod/SomeCoolMod/ModInfo.xml. That extra layer means the mod won’t load. ModInfo.xml has to sit exactly one folder deep inside Mods.
Mods are generally loaded in alphabetical order by folder name, which is why some packs ship folders prefixed AAA_ or ZZZ_. If a mod’s instructions say it must load after another, renaming the folder is the accepted way to force it — but follow the author’s instructions over this rule if they conflict.
3. Install a mod
Section titled “3. Install a mod”- Download the mod. 7daystodiemods.com and the official Fun Pimps mod section are the two places worth trusting.
- Check it supports your server version. A mod built for V1.0 or V2.x will usually fail on a V3.x server, or quietly damage a save.
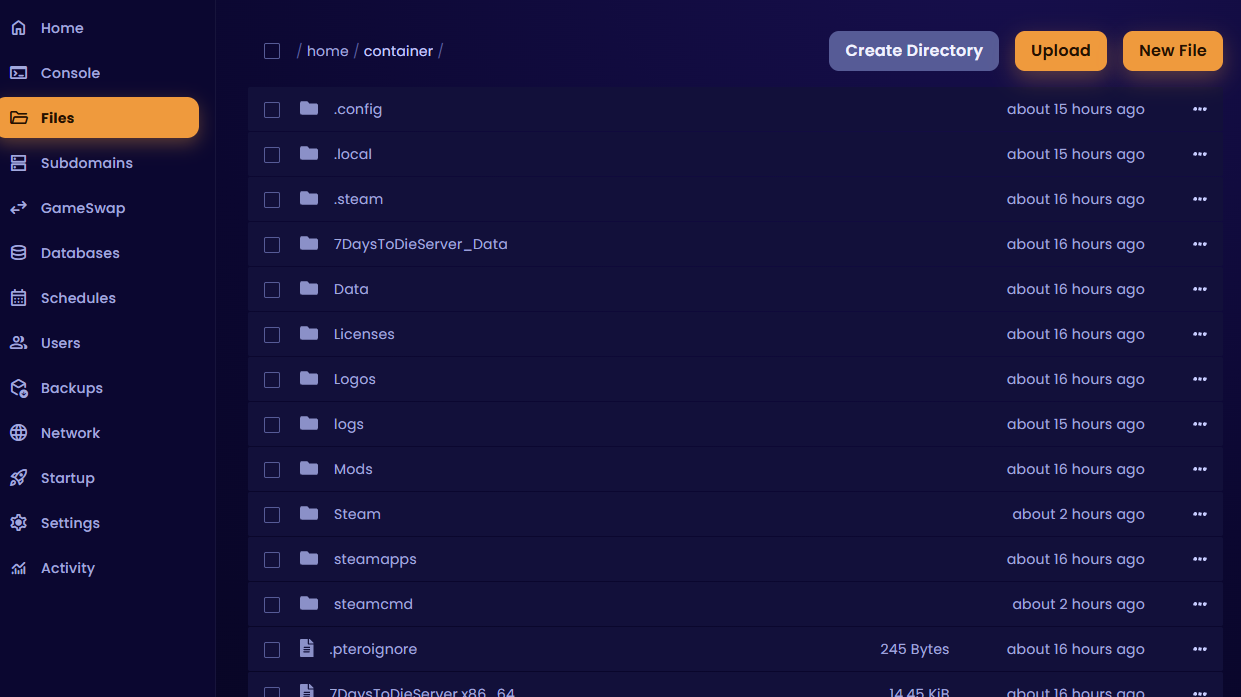
- With the server stopped, open the Files tab and find the
Modsfolder in the server root. Create it if it isn’t there. - Upload the mod’s
.zipintoMods, then choose Unarchive from the file’s menu. - Open the extracted folder and confirm
ModInfo.xmlis directly inside it. If there’s a nested duplicate folder, move the inner contents up one level and delete the empty wrapper. - Delete the leftover
.zipto keep your backups small. - Start the server.
4. Confirm the mod loaded
Section titled “4. Confirm the mod loaded”Don’t trust the file listing — trust the log. Watch the Console tab as the server starts:
INF [MODS] Start loadingINF [MODS] Trying to load from SomeCoolModINF [MODS] Loaded Mod: SomeCoolMod (1.0.4)INF [MODS] Loading doneIf your mod isn’t named in that block, the server never saw it — check the folder depth and that ModInfo.xml exists. If there’s an error right after the mod’s name, it isn’t compatible with your server version.
5. Tell your players what to install
Section titled “5. Tell your players what to install”This is where most confusion comes from, so be precise with your group.
| Mod contains | What players need to do |
|---|---|
| XML config changes only | Nothing. The server pushes these automatically |
| Custom icons or asset bundles | Install the mod locally, or icons and models will be wrong |
A .dll (Harmony / C# patch) |
Install the mod locally |
| Any overhaul modpack | Install the exact same version locally |
Any player who needs local files must also launch with EasyAntiCheat disabled, using Play (No EAC) in the launcher. Players joining an XML-only modded server can leave EAC on.
Installing an overhaul modpack
Section titled “Installing an overhaul modpack”Overhauls like Darkness Falls, Undead Legacy and War of the Walkers replace most of the game. They install the same way, with extra conditions.
- Start a fresh save. Overhauls can’t be dropped onto an existing world.
- Follow the pack’s instructions for which folders go in
Mods— some ship several, and all are required. - Every player installs the identical pack version locally.
- If the pack ships its own map, upload it to the generated worlds folder and set Game World to that world’s folder name.
- Expect to need more memory. If the server starts struggling on horde night after installing one, that’s why — open a ticket and we’ll size you up.
Removing a mod
Section titled “Removing a mod”- Stop the server.
- Delete the mod’s folder from
Mods. - Start the server and watch the console.
Troubleshooting
Section titled “Troubleshooting”| Issue | Cause and fix |
|---|---|
No [MODS] lines in the console at all |
The Mods folder is empty, misnamed, or the mod folders are nested one level too deep. The name is case sensitive: Mods |
| Mod folder is there but never loads | ModInfo.xml is one level too deep. Flatten the nested folder |
| Server starts then immediately shuts down | A mod isn’t compatible with your version. Remove mods one at a time until it starts |
| Mod loads but players are kicked or stuck on “Creating player” | The mod needs client-side files. Set EasyAntiCheat to false, have players use Play (No EAC), and make sure everyone has the same version |
| Missing icons, pink or grey models | Asset bundles aren’t installed on the client. Install the mod locally |
| Console players can’t join | Expected on an EAC-off server. Consoles require EAC on |
| Server slowed down after installing a pack | Overhauls raise RAM and CPU needs. Lower Max Allowed View Distance and Max Spawned Zombies first, then open a ticket |
Mod ships a .exe installer |
It won’t run. Your server is the native Linux build — look for a manual install option |
Questions? Reach out on the support Discord or create a ticket.